


- Recipes
- Rainbow Ombre Cake
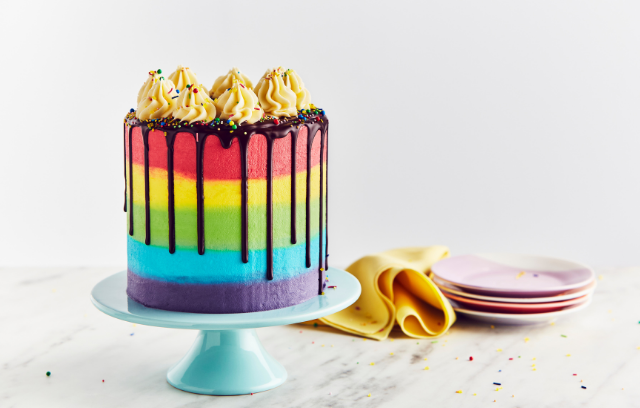
Rainbow Ombre Cake

Prep time:
Cook time:
The ombre cake is arguably one of the most spectacular looking cakes around, and this rainbow ombre buttercream cake doesn’t just look incredible, it tastes delicious too. It’s built from three sponge cakes sandwiched together with a vanilla buttercream filling. The spectacular rainbow is made from the same buttercream, but coloured with Dr Oetker’s icing colours (don’t forget a thin layer of ‘crumb coat’ icing to cover the sponge before you apply the rainbow as this prevents the cake from drying out and stops crumbs from getting in your outer layer of buttercream). The (extra) icing on the cake comes in the form of a chocolate ganache that drips down the sides. A true spectacle cake that will knock the socks off birthday guests (and probably passing strangers). Looking for more cake recipes? Look no further.
Share recipe
Ingredients
- 450g Margarine
- 450g Caster Sugar
- 8 medium Medium Eggs, beaten
- 20ml Dr. Oetker Vanilla Extract
- 450g Self-Raising Flour
- 550g Unsalted Butter, softened
- 1 kg Icing Sugar
- 1 Dr. Oetker Ready to Roll Icing Various Colours
- 100g Dr. Oetker 54% Dark Chocolate
- 1 Dr. Oetker Bright & Bold Sprinkles Mix
Method
Step 1
Pre-heat the oven to 180°C/160°C/Gas Mark 4. Grease and line 3x 20cm round cake tins.
Step 2
Put the margarine and sugar in a bowl and cream together. Pour in the eggs, vanilla extract and a spoonful of flour, mix together until combined and smooth. Sieve over the flour and fold into the mixture until just combined.
Step 3
Divide the mixture equally between your prepared cake tins and pop in the oven to bake for 35–40 mins until golden. To test whether your cakes are baked, put a skewer into the centre of your cake. If it comes out clean, it’s ready. Leave to cool in the tins for 15 mins, then transfer to a wire rack to cool completely.
Step 4
To make the buttercream, pop the butter into a large bowl and beat until smooth and lighter in colour.
Step 5
Beat in the icing sugar in 4 intervals, making sure it’s well combined after each addition. Pop in the vanilla extract and beat the buttercream until light and fluffy in texture. If it is too firm, add 1-2 tsp of milk to soften.
Step 6
Now it's time to assemble the cake. Once your cakes are cooled, use a serrated knife to cut any domed tops off the sponge layers. Pop a sponge layer onto a cake board and spread a layer of buttercream on top, repeat with the other sponge layers to sandwich them together. Cover the top and sides of the cake in a thin layer of buttercream to create a crumb coat. Use a palette knife or cake scraper to smooth out the buttercream. Put your cake in the fridge for 30 mins to allow the crumb coat to set.
Step 7
While your cake is chilling, it’s time to colour the buttercream. Pop a couple of spoonfuls of uncoloured buttercream into a piping bag fitted with an open star nozzle and set aside for later.
Step 8
Divide the remaining buttercream equally into 5 bowls and add 1 tsp of red colour gel to one bowl. Mix until you get an even and consistent colour. Add some more of the red gel to get a stronger colour if needed. Repeat with the other colours until you have bowls of red, yellow, green, blue and purple buttercream. Pop each coloured buttercream into a piping bag and cut a 1cm hole in the end of each bag.
Step 9
Once your cake is chilled, pipe 2 rings of purple buttercream around the cake starting at the base of the cake. Repeat with the blue buttercream, then green and yellow, working your way up the cake, so you have 2 rings of each colour buttercream around the cake. Finish with the red buttercream, piping 1 or 2 rings on top of the yellow buttercream (depending on how much space you have). Finally, spread the remaining red buttercream on top of the cake using a palette knife.
Step 10
Use a palette knife or cake scraper to smooth the sides of the cake (it’s easiest to do this using a cake turntable). Fill in any gaps with buttercream and continue to do this until your buttercream is smooth. Put in the fridge to chill and allow the buttercream to set.
Step 11
Whilst the cake is chilling, it’s time to make the chocolate drip. Put the chocolate and butter in a bowl and melt in the microwave for 30 secs then stir. If it’s not fully melted, put it back in the microwave in 10-second bursts, stirring each time until you have a lovely smooth ganache.
Step 12
Take your cake out of the fridge, then put your chocolate ganache into a piping bag and cut a small hole in the end.
Step 13
Pipe drips around the edge of the cake, then fill in the top and smooth out using a palette knife, if needed.
Step 14
Use your reserved uncoloured buttercream in the piping bag to pipe swirls around the top of the cake. Add some Bright and Bold sprinkles to the buttercream swirls and serve.
Tips or serving suggestions
Your cake will keep for up to 3 days stored in an airtight container.
Shop the ingredients
-
On OfferValueLIFE 1w+
Ocado Medium Free Range Eggs 12 per pack
12 per pack£2.60
21.7p eachFor over 10,000 products you know (and love), we now match the price of your like-for-like shop to tesco.com, including promotions and Clubcard prices. If we’re not already the same price or less, we’ll email you a voucher for the difference within 72 hours. Everyday Savers -
Value
Ocado British Self Raising Flour 1.5kg
1.5kg79p
52.7p per kgFor over 10,000 products you know (and love), we now match the price of your like-for-like shop to tesco.com, including promotions and Clubcard prices. If we’re not already the same price or less, we’ll email you a voucher for the difference within 72 hours. Everyday Savers -
Other
-
Dr. Oetker Madagascan Vanilla Extract 35ml
35ml£1.45
41.4p per 10mlFor over 10,000 products you know (and love), we now match the price of your like-for-like shop to tesco.com, including promotions and Clubcard prices. If we’re not already the same price or less, we’ll email you a voucher for the difference within 72 hours. -
LIFE 1m+
Dr. Oetker Ready to Roll Coloured Fondant Icing 5 x 100g
5 x 100g£2.95
59p per 100gFor over 10,000 products you know (and love), we now match the price of your like-for-like shop to tesco.com, including promotions and Clubcard prices. If we’re not already the same price or less, we’ll email you a voucher for the difference within 72 hours. -
LIFE 1m+
Dr. Oetker Bright & Bold Sprinkles Mix 109g
109g£2.50
£2.29 per 100gFor over 10,000 products you know (and love), we now match the price of your like-for-like shop to tesco.com, including promotions and Clubcard prices. If we’re not already the same price or less, we’ll email you a voucher for the difference within 72 hours.